Introduction
We covered the buying decision behind wall mounted kitchen faucets in our last post. This one is for the people who actually have to install them, contractors, MEP engineers, and plumbing teams coordinating rough-in before a wall gets closed up. Wall mounted faucets aren’t difficult to install, but they’re far less forgiving of mistakes than a standard deck mounted faucet, because most of the problems only show up after the wall is finished and the fixture is live.
Here’s what we’d flag as the details that actually matter, including a few points that are specific to how walls are typically built on Saudi projects.
Why Wall Mounted Installation Is a Different Job, Not Just a Different Faucet
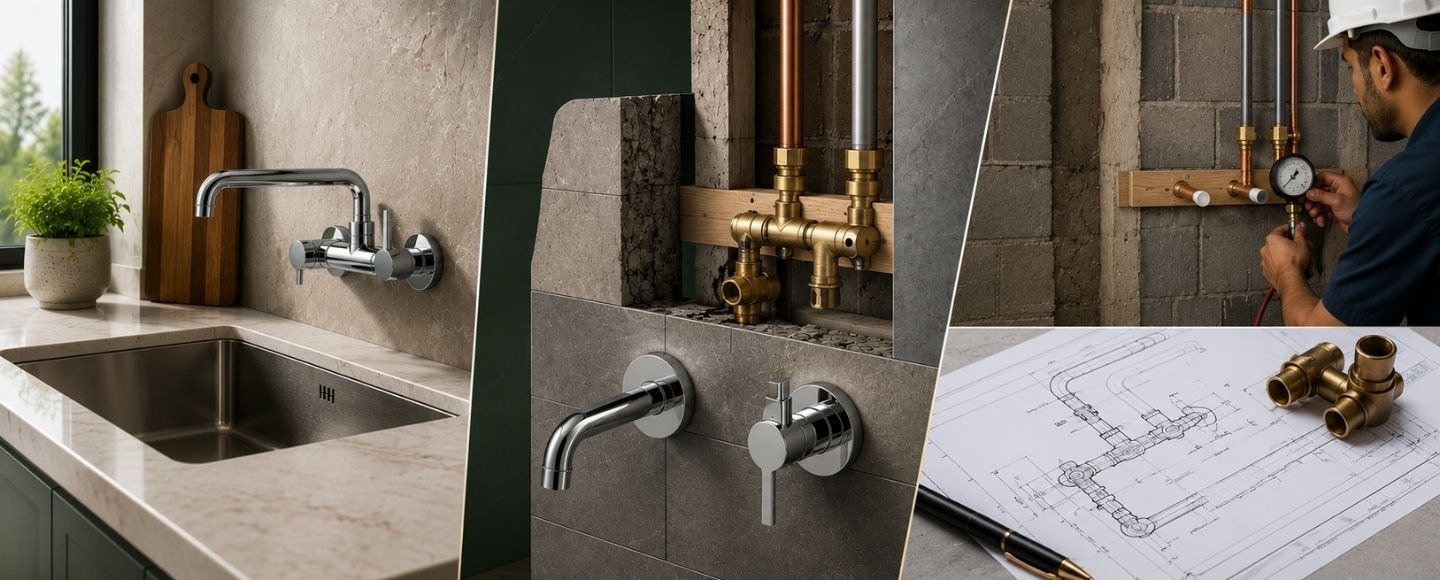
With a deck mounted faucet, the supply lines come up through the counter or from below, and the faucet itself can be swapped, adjusted, or replaced with relatively little disruption. A wall mounted faucet flips that. The supply lines are routed inside the wall and terminate at a fixed point that has to be right the first time, height, horizontal position, and spacing between hot and cold lines all need to be locked in before drywall, tile, or cladding goes up.
That means the plumbing rough-in for a wall mounted faucet isn’t a task that happens in isolation. It has to be coordinated with the framing or masonry trade, the tiling or wall-finishing trade, and the sink or cabinetry installer, all working from the same set of measurements, ideally pulled from the specific faucet and sink that will actually be installed, not a generic standard.
A Saudi-Specific Detail: Masonry Walls Change the Anchoring Approach
Most installation guidance written for European or North American markets assumes wood-stud wall framing, where “blocking” means adding wood backing between studs. On the majority of Saudi residential and commercial projects, walls are concrete block or reinforced concrete rather than wood-framed.
That changes the anchoring approach. Instead of wood blocking installed during framing, the faucet’s mounting point typically needs masonry anchors or a cast-in mounting plate set during the concrete or block work, which has to be planned even earlier in the build sequence than wood blocking would, since it’s tied to the structural wall build rather than a later framing step. This is worth flagging explicitly with your structural or civil contractor, not just the plumbing trade, since it’s easy to assume “blocking” means the same thing it does in imported installation manuals.
Getting the Rough-In Height Right
This is the detail that causes the most callbacks. The rough-in height for a wall mounted kitchen faucet needs to be set relative to the finished sink rim, not the rough floor or an assumed counter height, because if the sink height changes even slightly during the build, the faucet’s reach and spout height relative to the basin will be off.
The practical approach we’d recommend: confirm the exact sink model and its rim height before setting the rough-in, then reference the specific faucet manufacturer’s installation template for the correct valve height and spout drop. Don’t rely on a “standard” height carried over from a previous project, since spout reach and drop vary between faucet models.
Supply Line Spacing and Wall Support
Two structural details need attention before the wall is closed.
Hot and cold line spacing. Most wall mounted faucets require a specific center-to-center spacing between the hot and cold supply lines, matched to the faucet’s valve body. Getting this wrong by even a small margin can mean the trim kit won’t sit flush against the finished wall.
Blocking or anchoring behind the finished surface. Because the faucet body anchors into the wall and carries more direct mechanical load than a deck faucet resting on a countertop, solid support is needed behind the finished wall surface at the mounting point, wood blocking on framed walls, or masonry anchors and cast-in mounting plates on concrete block walls, as noted above. This needs to be coordinated with whoever is building out the wall; it’s not something a plumber can add after the fact once the wall surface is finished.
Planning for Access and Future Maintenance
One question worth asking before installation, not after: how does this specific faucet model handle future repairs? Some wall mounted faucets are designed with a removable trim plate or access panel that allows the valve body to be serviced without opening the wall. Others assume the wall itself or an adjacent cabinet provides sufficient access.
This is worth confirming with the supplier at the point of purchase, since it changes how the wall should be finished around the fixture. A wall that’s fully tiled with no planned access point makes even routine maintenance far more disruptive down the line.
Testing and Code Compliance Before You Close the Wall
Before any wall finishing goes over the rough-in, the supply lines should be pressure tested and checked for leaks at the exact point where the faucet will connect. This sounds obvious, but it’s the single most common step that gets rushed on tight schedules — and it’s far cheaper to catch a leak or pressure issue before tiling than after.
Rough-in work and pressure testing on Saudi projects should also be carried out in line with the plumbing provisions of the Saudi Building Code (SBC 701 and related sections), the same as any other plumbing installation. This isn’t a separate step from the testing above; it’s the standard your testing should already be meeting, so it’s worth confirming with your MEP consultant that the testing procedure and documentation align with SBC requirements rather than treating it as a generic pressure check.
It’s also worth confirming water pressure and flow at the rough-in point matches what the specific faucet model requires, since this is a plumbing design detail that depends on the building’s overall supply layout, something your MEP consultant will typically have already accounted for in the project drawings, but worth a final check against the actual fixture being installed.
A Practical Pre-Installation Checklist
Before closing the wall around a wall mounted kitchen faucet installation, it’s worth confirming:
- Sink model and rim height are finalized and match the rough-in measurements
- Faucet manufacturer’s installation template has been referenced for exact valve height and spout drop
- Hot and cold supply line spacing matches the specific faucet’s valve body requirements
- Wall support is in place at the mounting point, wood blocking or masonry anchors/cast-in plate, matched to the wall type
- A decision has been made on access provisions for future maintenance
- Supply lines have been pressure tested at the rough-in point, in line with SBC requirements, before wall finishing begins
Sourcing and Installing With Kanzotech
At Kanzotech, we work with contractors and MEP teams to make sure the faucets specified for a project come with clear installation documentation and consistent rough-in specifications, so coordination between trades doesn’t turn into guesswork on site. Beyond supply, we also provide installation services directly, so a project can source the faucet and coordinate installation through a single point of contact rather than managing supplier and installer separately.
If you’re planning a project involving wall mounted faucets, our team can share manufacturer installation templates and rough-in requirements ahead of your plumbing drawings being finalized, and walk through installation service options for your project.
Frequently Asked Questions
1.What is the standard rough-in height for a wall mounted kitchen faucet?
There isn’t a single universal standard, the correct height depends on the specific faucet’s spout drop and the finished sink’s rim height. It should always be confirmed against the manufacturer’s installation template and the actual sink being used, rather than assumed from a previous project.
2.Can wall mounted faucet installation be done after tiling is complete?
It’s possible but far more disruptive, since it usually means cutting into the finished wall to access or reroute supply lines. This is why rough-in planning needs to happen before the wall is finished, not after.
3.Who should coordinate the rough-in for a wall mounted faucet, the plumber or the contractor?
It typically needs to be a coordinated effort between the plumbing trade, the framing or masonry trade, and whoever is finishing the wall, since all three need to work from the same measurements. On larger projects, the MEP engineer usually owns this coordination.
4.What happens if the hot and cold supply lines are spaced incorrectly? The faucet’s trim kit may not sit flush against the wall, or the valve body may not connect properly, often requiring the wall to be reopened to correct the spacing. This is why spacing should be checked against the specific faucet model before rough-in, not assumed as standard.
Do all wall mounted faucets allow for future repair access?
No, this varies by model. Some include a removable trim or access panel, while others rely on the wall or an adjacent cabinet for service access. It’s worth confirming this with the supplier before finalizing how the wall will be finished.
5.Does Kanzotech handle installation, or only supply the faucets?
Kanzotech supplies faucets and also provides installation services directly, so contractors and project teams can coordinate sourcing and installation through a single point of contact.
This post is intended as a general planning reference for contractors and MEP teams. Rough-in measurements, supply line spacing, and code compliance should always be confirmed against the specific faucet manufacturer’s documentation and verified by a licensed plumber or MEP engineer for your project. For product specifications and installation documentation, contact the Kanzotech team.



 August 13, 2026
 HYZAM KENZ



Comments
No comments yet. Be the first to comment!